Atoms, Elements, & Compounds
Activity lab notes to model atoms, elements, & compounds
Questioning is the foundation of all learning.
The first step in rejecting not knowing is to ask, why?
Sweetland
Introduction
An activity to introduce elements, atoms, and compounds with a concrete model using bolts and nuts. With suggestions of a summative activity to create an element fact sheet, book, poster, or leaflet. Some chemical change activities and acid, base, & neutral investigation sequence
Concepts
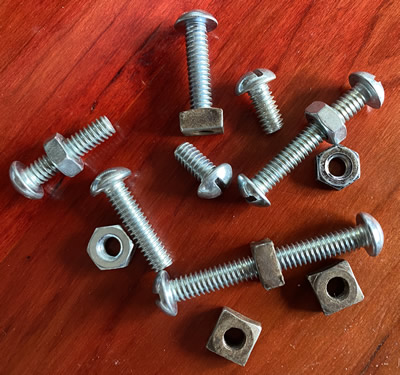
- Nuts and Bolts can be used to make a model of compounds.
- Compounds are chemically bonded elements.
- An atom is the basic unit of a chemical element.
- Each is roughly 10-8 cm in diameter, consists of a tiny, dense, positively charged nucleus made of neutrons and protons, surrounded by a cloud of negatively charged electrons. Each chemical element consists of atoms that possess a characteristic number of protons. Atoms are held together in molecules by sharing electrons.
- A molecule is a group of atoms bonded together, representing the smallest fundamental unit of a chemical compound that can take part in a chemical reaction.
- Element (chemical element) - each element is one of more than one hundred substances that cannot be chemically change to another element or broken down into simpler substances. They are considered primary components of matter. Each element is distinguished by its atomic number, the number of protons in the nuclei of its atoms.
Modeling Atoms, Elements, & Compounds
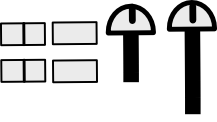 Get the following materials
- 1 long bolt
- 1 short bolt
- 2 hex nuts
- 2 square nuts
Place both kinds of nut atoms and bolt atoms in 4 separate piles on your desk.
Short bolt Hex nut Square nut Long bolt
How many different kinds of atoms do these nuts and bolts represent?
If each kind of atom makes up a different element, How many different elements are represented?
In order to make a compound, at least two atoms have to combine, or be bonded together.
For example, a short bolt atom may be combined (bonded) to a square nut atom.
A sketch representing this combination could be:
Assuming that Bo is a symbol for a short bolt atom and Sq a symbol for a square nut atom, then the above combination could be described by the following symbol BoSq.
What would the following symbols represent? BoSq2
What does the subscript 2 mean?
Make a sketch representing this combination.
The symbol for a long bolt atom and a hex nut atom are shown below.
Bl Hx
If a long bolt atom and hex nut atom were combined , the what would the shorthand symbol be?
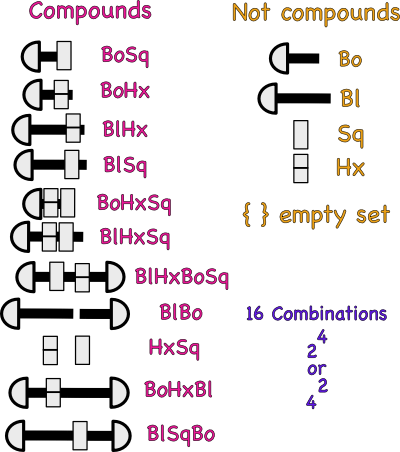
- Use 1 long bolt, 1 short bolt, one square nut and one hex nut to determine how many other different combinations (compounds) can be made.
- Once a combination is made (1) draw it and (2) write its symbol in Data Table #1.
- Then take the combination apart and try again.
- Those already constructed have been entered in the table.
- Darken the heads of long bolts in your sketch.This will serve to distinguish them from short ones.
| Picture of Combination | Shorthand Symbol |
|---|---|
|
BoSq |
|
BlHx |
|
|
|
|
|
|
|
|
|
|
|
|
|
|
|
|
|
|
|
How many different compounds did you make?
To be counted as a different compound the combination has to have a different formula.
How do your combinations compare to another teams?
The set of symbols in the table above are also called formulas.
A symbol represents one kind of atom, but, a formula represents a combination of more than one kind of atom. It tells the number and kinds of bolts and nuts (atoms) held (bonded) together.
What is the formula for the combination of two short bolts and two square nuts?
What do the subscripts mean?
Using long bolts and hex nuts, make a compound that
has the formula
Bl2Hx2 and sketch it.
Could it be made in a different way?
If so, sketch it.
What information about a combination is lost by just using the symbol?
Sketch the number of different ways two long bolts can be combined with four square nuts in the table below and write a formula for each. All four nuts have to be used each time.
| Picture of Combination | Formula |
|---|---|
|
|
|
|
|
|
|
|
|
Shorthand symbols could be used to describe how to form a combination (compound). For example, a combination of two long bolts and two hex nuts are threaded together.
This could be described in words
A ( _______________________) is made from
TWO LONG BOLTS ( ______________)
PLUS TWO HEX NUTS ( ______________)
TWO-BOLT-TWO-NUT COMBINATION (______________)
or pictures
or by using symbols
2B l + 2Hx -> Bl2 Hx2
What does the Bl and Hx to the left of the arrow represent?
What does the arrow mean?
What does the formula, Bl2 Hx2 to the right of the arrow mean?
What do the prefix numbers represent on the left side of arrow?
What about the subscript numbers to the right of the arrow?
Create your own interaction with bolts and nuts:
Interaction 1
Draw a Diagram
Write a word description of this interaction.
Now, write a description using symbols.
Interaction 2
Draw a Diagram
Write a word description of this interaction.
Now, write a description using symbols.
How does this relate to the chemisty?
There are millions of different substances in the universe.
However, scientists believe that everything on the earth and the stars are made of various combinations of only about 100 basic substances called elements.
They can be explored in the electronic periodic table of elements supported by the Los Alamos national laboratory.
| Name | Symbol | Name | Symbol | Name | Symbol |
|---|---|---|---|---|---|
| Aluminum | Al | Iodine | I | Oxygen | O |
| Calcium | Ca | Iron | Fe | Potassium | K |
| Carbon | C | Lead | Pb | Silver | Ag |
| Chlorine | CI | Magnesium | Mg | Sodium | Na |
| Copper | Cu | Mercury | Hg | Sulfur | S |
| Helium | He | Nitrogen | N | Zinc | Zn |
| Hydrogen | H |
The penny is made of copper.
What is its symbol?
Many beverage cans are made of aluminum.
What is its symbol?
The oxygen found in air is made of two atoms.
Write its formula.
The nitrogen in air is also made of two atoms.
What would its formula be?
When atoms of elements combine, compounds are formed.
A compound is identified by two things:
- The kinds of atoms in it and
- The number of each kind of atom.
The formula for the compound water is H2O.
What atoms are found in water?
How many of each kind of atom are there?
Complete the table below by adding the missing information.
| Substance | Formula | kind of atom | Number of each Atoms |
|---|---|---|---|
| Water | H2O | H | 2 |
| O | 1 | ||
| Table Salt | NaCl | Na | |
| Cl | |||
| Dry Cleaning Fluid | CC14 | ||
| Sugar | C12H22O11 | ||
| Ammonia | NH3 | ||
| Baking Soda | NaHCO3 | ||
| Rust | FeO | ||
Bolt & nut combinations
Element fact sheet, book, poster, or leaflet
Make an element fact sheet, book, poster, or leaflet (work) to share information about an element. You could collaborate with others with each selecting a different element and creating pages to put in a book.
Suggestions for inclusion:
- Use the name of your atom on the title of your work. Or as a chapter or section in a multi-element book.
- Your name on your work.
- A table of contents for the work. If multiple elements include subcategories for each element.
- Atomic number of your element somewhere in the work.
- Atomic mass of your element somewhere in the work.
- The symbol for your element somewhere in the work.
- A color coded diagram of your element's nucleus showing the particles in the nucleus.
- The number of protons in the nucleus.
- The number of neutrons in the nucleus.
- The electron configuration notation, orbital notation and electron dot notation of your element.
- A short history of your element. Who found it, when was it discovered, etc.
- The appearance of your element in its pure form at room temperature. Is it shiny? yellow? dull? etc. Consider including photos.
- The physical state of your element at room temperature. Is it a solid, liquid or gas?
- How common is your element in nature?
- How could a pure sample of your element be made?
- What are the common uses for your element?
- What are some health effects of your element?
- What are some environmental effects of your element?
- What are the name, formula and uses for one compound containing your element?
- What is the name, formula and uses for another compound containing your element?
- Glossary of key words in your work.
Chemical change activities
Make a cupric sulfate solution and put an iron nail in it for 30 seconds.
Activity Observing a Single Replacement Reaction
Materials
Cupric sulfate crystals, distilled water, beaker or glass container, stirring rod, iron nail, safety goggles and gloves
Prepare the Cupric Sulfate Solution:
- Put on your safety goggles and gloves
- Work in a well-ventilated area
- Measure 20 mL of distilled water into the beaker
- Add approximately 1 gram of cupric sulfate crystals to the water
- Stir until completely dissolved, forming a blue solution.
Procedure
- Carefully place a clean iron nail into the cupric sulfate solution.
- Allow it to sit for 30 seconds.
- Observe
- After 30 seconds, remove the nail
- Observe any changes in color, texture, or deposits on the nail and in the solution.
Explanation
This demonstrates a single replacement reaction where iron displaces copper from the cupric sulfate solution:
CuSO₄ (aq) + Fe (s) → FeSO₄ (aq) + Cu (s)
You'll notice a reddish-brown deposit (copper) forming on the nail, and the solution may change color as iron sulfate forms.
Safety Note: Dispose of chemicals properly and wash your hands after the experiment.
Make an iron sulfate solution and put a magnesium wire into it for 20 seconds.
Activity Observing a Single Replacement Reaction
Materials
10 grams of iron sulfate (FeSO₄), beaker or glass container, distilled water, magnesium wire
Prepare the iron sulfate solution
- Dissolve 2 grams of iron sulfate (FeSO₄) in 20 mL of distilled water and stir until fully dissolved
Procedure
- Put on your safety goggles and gloves
- Work in a well-ventilated area.
- Cut a piece of clean magnesium wire.
- Immerse the wire into the iron sulfate solution for 20 seconds
- Remove the wire after 20 seconds and observe
Observe changes, such as coating formation or color changes, indicative of a chemical reaction.
Dispose of chemicals properly after the experiment.
Acid, base, & neutral investigation sequence
Use ph paper to test different liquids for their ph and decide if they are acidic, base, or neutral.
Ph is rated from 0 - 14 with 7 being neutral or 1-12 with 6 being neutral.
Liquids beauty - shampoo, conditioner, face cream, scrubs ...
Drinks - orange juice, tomto juice, milk, different pops, colas ...
Other -
Reviewed but not formatted for newer plan.
Authors - Staci Ivester & Jacquie Cunningham
Concept:
A substance is considered acidic or basic according to where it ranges on a pH scale.
Background Information:
Acids can be characterized as being sour in taste, having a pH value of less than even and turning litmus paper red. Bases can be characterized as being bitter in taste, feeling slimy, turning litmus paper blue, and having a pH value better than seven.
To determine if a substance is acidic or basic a test is performed. One test involves paper called pH paper to be dipped into the unknown solution. A color appears on the pH paper and it is compared to a color chart to determine whether or not the solution is acidic or basic. The color chart also has numbers that represent how acidic or basic the solution. These numbers are represented on a pH scale. The pH scale ranges from 0-14, a pH value of 7 or below is acidic and a pH value of 7 or higher is basic
***Remember to never taste a substance that you are not familiar with because both acids and bases can be harmful to people.***
Activity Sequence:
Measuring pH
Determining pH of common substances
Making a Natural pH indicator
Measuring the pH of natural water
Measuring Soil pH
Soil buffering
Looking at acid effects on metals
Activity
Measuring pH
Materials
Ph paper and color chart, distilled water, white vinegar, household ammonia (or baking soda), 3 small and clear cups, 3 spoons, measuring cups and spoons (1/2 cup, ¼ and 1 teaspoon), and a notebook and pencil
Procedure
Rinse cups with distilled water and label one cup each with vinegr, ammonia, and water.
Pour ¼ cup of distilled water into each cup.
Add ½ teaspoon of vinegar to the properly labeled cup. Add ½ teaspoon of ammonia to the properly labeled cup. Mix each mixture with a spoon.
Do not add anything to the water cup.
Dip an unused, clean strip of pH paper in the vinegar cup for about 2 seconds and immediately compare with the color chart. Write down the approximate pH value and set the cup aside.
Dip an unused, clean strip of pH hpaper in the ammonia cup for about 2 seconds and immediately compare with the color chart. Write down the approximate pH value and set the cup aside.
Dip an unused, clean strip of pH paper into the water cup for about 2 seconds and immediately compare with the color chart. Write down the approximate pH value.
Have students share their results – asking questions to find out if the 3 substances were acidic or basic. Where any of the substances neutral?
Activity
Determine pH of common substances
Materials
PH paper, 3 fresh whole fruits (lemon, lime, orange, or melon), 3 beverages (cola, carbonated non-cola, milk), 1/8 teaspoon boraz, measuring spoons (1/4 and 1/8 teaspoons), 4 small, clear cups or glasses, 1 clean stirring spoon, notebook and pencil, paring knife.
Procedure
Cut each fruit in half, drying off the knife after each cut.
Place an unused strip of pH paper half-on and half-off the inside of the cut fruit. Leave until wet (about 2 seconds). Immediately compare with the color chart. Write down the approximate pH value of the fruit.
Repeat the same process for the other 2 fruits.
Label the 3 cups one cola, another non-cola, and the third milk.
Pour each liquid into an appropriately labeled cup.
Dip an unused strip of pH paper into the cola, compare with the color chart, and record the result. Repeat the same process for the remaining beverages. Be sure to use a clean, unused strip of pH paper for each one.
Add 1/8 teaspoon borax to ¼ cup distilled water and stir for about 2 minutes. Dip an unused strip pH paper in the borax mixture, compare with the color chart, and record the results.
Have students observe their results – solving questions to find out if the 3 substances were acidic or basic. Were any of the substances neutral?
Activity
Making a Natural pH Indicator
Materials
Sliced red cabbage, stainless steel or enamel pan or microwave casserole dish, 1 quart water, stove, microwave, or hotplate, white vinegar, ammonia or baking soda, clear non-cola beverage, 3 clear glass cups, measuring spoons, spoons for stirring, notebook and pencil.
Procedure
Boil cabbage in a covered pan for 30 minutes or microwave for 10 minutes. (Don't let water boil away.)
Let cool before removing the cabbage.
Poor about ¼ cup of cabbage juice into each cup.
Add ½ teaspoon ammonia or baking soda to one cup and stir with a clean spoon.
Add ½ teaspoon vinegar to second cup, stir with a clean spoon.
Add about 1 teaspoon clear non-cola to the last cup and stir with a clean spoon.
After answering the next two questions for this experiment, pour the contents of the vinegar cup into the ammonia cup.
Ask students what color change took place when you added vinegar to cabbage juice.
Did the ammonia turn the cabbage juice indicator red or blue?
What happens to the color when you pour the contents of the vinegar cup into the ammonia cup?
Activity
Measuring the pH of Natural Water
Materials
Ph paper and color chart, clean paper cups, notebook and paper
Procedure
Locate a stream, river, lake, or pond. Go with an adult.
Scoop some of the surface water into a cup (this mean NOT submerging the cup into the water, just drag the cup along the top of the water until a sample is taken).
Measure the pH of the water using other pH paper or a garden soil pH testing kit and record the results.
Ask students how acidic the water is and base them compare their findings with other students.
Activity
Measuring Soil pH
Materials
Garden soil pH test kit, distilled water, 2 cups soil from each of the two or three different locations (some of the soil will be needed for the "Soil Buffering" experiment), measuring spoons, digging tool, self-sealing plastic bags, notebook and pencil
Procedure
Pick two or thre different soil locations, such as a garden, wooded area, city park, or meadow. Ask an adult to go with you.
At each location, observe the plants and animals living in or rooted on these soils, especially those that are in greatest numbers. Write down as much as you can about what you find. Dig down about 2 inches, scoop out 2 cups of soil, and seal it in a plastic bag for later use. Label each plastic bag. Be sure to clean your digging tool after collecting soil samples at each location
Measure the pH of each soil sample following the directions provided in the garden soil pH test kit, and record the approzimater pH of each soil sample. Save the excess soil from each site for use int eh "Soil Buffering" experiment.
Ask students if there were any differences between plant and animal life of each location.
Ask students if their soil samples were acidic or basic.
Activity
Soil Buffering
Materials
Ph paper and color chart or garden soil pH test kit, about 2 cups of soil from a garden, wooded area, lawn, or school yard, distilled water, white vinegar, measuring cups and spoons, stirring spoon, large funnel, 3 coffee filters, paper cup, notebook, and pencil
Procedure
Pour 1 teaspoon of vinegar into 2 cups of distilled water, stir well and check the pH with either pH paper or a garden soil pH testing kit. The pH of the vinegar/water mixture should be about 4. If it is below that, add a sprinkle of baking soda, stir well, and recheck the pH, but if it is about ph 4 add a drop or two of vinegar and again recheck the pH.
Put 1 coffee filter into the funnel, and fill the filter with soil from one location. Do not pack the soil down.
Hold the filter over a paper cup and slowly pour the vinegar/water mixture over the soil until some water collects in the paper cup (the filter may clog quickly, but you need only a small amount of water).
Check the pH of the collected water sing either pH paper r a garden soil pH testing kit and record the sesults.
Repeat the experiment with other soil samples, using a new coffee filter for each sample.
Ask students if the pH of the collected water stayed the same as the original mixture, increases, or decreases?
Ask students what they can add to the soil to increase its buffering capability (buffering is a substance that minimizes changes in the acidity of a substance when an acid or base is added to the solution. Soil sometimes combines substance, like limestone, that buffer acids or bases.
Activity
Looking at Acid effects on Metals
Materials
Ph paper and color chart or garden soil pH testing kit, 2 small, clear glasses (non metal), 2 clean copper pennies (use pennies minted before 1983), white vinegar or fresh –squeezed lemon juice, distilled water, plastic wrap, notebook and pencil
Procedure
Label one glass water and the other vinegar or lemon juice depending on which acid you use.
Place one penny in each glass. Be sure to use pennies minted before 1983 because pennies minted after that time have a different chemical composition.
Barely cover one of the pennies with either vinegar or lemon juice.
Di a strip of pH paper into the vinegar, or lemon juice, for about 2 second and compare with the color chart. Or use a garden soil pH test kit. If the pH is below 8, add a tiny amount (less than 1/8 teaspoon ) of baking soda, or a drop of ammonia, and recheck the pH. Repeat this process until he pH is between 6 and 7. Record the pH of the water..
Add enough distilled water to the glass labeled water to barely cover the other penny.
Dip a strip of pH paper, into the distilled water for about 2 seconds and compare with this color chart. Or use a garden soil pH test kit. IF the pH is below 6, add a tiny amount (less that 1/8 teaspoon) of baking soda, or a drop of ammonia, and recheck the pH. Repeat this process until the pH is between 6 and 7. Record the pH of the water.
Seal the top of each glass with plastic wrap to prevent evaporation.
Place in a safe, dry place for about 5 days.
After about 5 days, observe the changes that occurred in each glass.
At the end of the experiment, wash off the pennies with water, and pour the contents of the glasses down the sink (do not drink).
Ask students what changes took place, if any, in each glass.