
Community Unit with activities & plans
Community unit & packet with lesson plans, activities, & lab notebook
Healthy communities require an ecological world view.

Introduction
A unit or packet with a sequence of activities and plans to facilitate a review of environmental factors and develop a deeper understanding of the relationships of organisms and populations as communities within environments. Includes hands-on activities with plants, seeds (embryo, cotyledon, & seed coat), crickets, anoles, decomposers, and terrariums.
Specific activities include: What is a natural community?, growing seeds, seed & their parts, plants & food or energy, embryos & food or energy, building a terrarium , crickets, cricket's food, how much do crickets eat?, anole observations, how much does an anole eat?, how many plants feed an anole?, decomposers, and communities.
Overview
- Introduction
- Big ideas, concepts, facts, & outcomes
- Science content concepts & outcomes
- Inquiry & science process concepts
- Pedagogical overview
- Activities sequence
- Focus questions
- Materials
- Scoring guide suggestions
- Unit activity sequence
- Activity 1 - What is a natural community?
- Activity 2 - Growing seeds
- Activity 3 - Seed & their parts
- Activity 4 - Plants & food or energy
- Activity 5 - Embryos & food or energy
- Activity 6 - Building a terrarium
- Activity 7 - Crickets
- Activity 8 - Cricket's food
- Activity 9 - How much do crickets eat?
- Activity 10 - Anole observations
- Activity 11 - How much does an anole eat?
- Activity 12 - How many plants feed an anole?
- Activity 13 - Decomposers
- Activity 14 - Communities
- Lab notes
- Lab note 1 - What is a natural community?
- Lab note 2 - Growing seeds
- Lab note 3 - Seed & their parts
- Lab note 4 - Plants & food or energy
- Lab note 5 - Embryos & food or energy
- Lab note 6 - Building a terrarium
- Lab note 7 - Crickets
- Lab note 8 - Cricket's food
- Lab note 9 - How much do crickets eat?
- Lab note 10 - Anole observations
- Lab note 11 - How much does an anole eat?
- Lab note 12 - How many plants feed an anole?
- Lab note 13 - Decomposers
- Lab note 14 - Communities
Background information:
This plan is designed for learners who have very little prior knowledge of environmental communities. A sequence of activities often included in a K-6 curriculum sequence similar to the following:
Related study topics:
- Organisms - Plants & animals
- Life cycle
- Environment
- Communities - this unit
- Ecosystems
- Health and the environment
- Sustainable practices
Since many of the activities require days and weeks to observe how the organisms change, I usually taught some some other science activities during those times.
Big ideas, concepts, facts, and outcomes
Big ideas
- Healthy communities are essential to the survival of all organisms, including humans, as well as for their aesthetic value. Such as with terrariums, aquariums, natural reserves, wild spaces, green spaces, and parks. Healthy communities are maintained with a balance between interdependent organisms of different species that grow and live together in a specific habitat. However, they sometimes get out of balance. Science helps us to understand them and how we might assist in sustaining their health.
Related concepts and facts
- Better decisions (claims) are made when information is verified, with evidence and reasoning, before being considered accurate and used to reason and develop explanations and models to understand the world and make decisions.
- People make better decision when they understand and consider the positive and negative influences that effect their decision making.
Outcome
Use accurate verifiable information to consider and decide how communities can be balanced or made more sustainable.
Science concepts: physical, earth, life
Big ideas: A community is a group of interdependent organisms of different species that are growing and living together in a specific habitat. The health of a community depends on a balance between the populations of organisms living within it and the availability of resources necessary for their survival.
Related concepts
- A population consists of all individuals of a species that occur together at a given place and time
- Populations of organisms can be categorized by the function they serve in a community (producer, consumer, & decomposer).
- Plants and some microorganisms are producers - they make their own food.
- All animals, including humans, are consumers, which obtain food by eating other organisms.
- The population of an ecosystem depends on the resources available and abiotic factors, such as quantity of light and water, range of temperatures, and soil composition.
- Given adequate biotic and abiotic and no disease or predators, populations (including humans) increase at rapid rates.
- Lack of resources and other factors, such as predation and climate, limit the growth of a population in specific communities in the ecosystem.
- Relationships may be competitive or mutually beneficial.
- Mutually beneficial or symbiotic is when two or more different organisms (species) live in close physical association, typically to the advantage of both. As opposed to a parasite, which is an organism that lives in or on another organism (host species) and derives nutrients at the other organism's expense. All mistletoes species are parasites that attach to tree (oaks & poplars) branches (host) and siphon water and nutrients to survive. In winter, they are green and provide food and shelter for animals.
- Some species have adapted to each other to the point that they could not survive without each other.
Source Life science knowledge base
Outcome
- Explain relationships among organisms that include the flow of energy and resources among producers, consumers, and decomposers in a community..
- Energy is stored in seeds so they can grow and produce their own.
Vocabulary
Population, seed, cotyledon, seed coat, embryo, leaf, root, living, community, environmental factor, light, heat, temperature, moisture, shelter, soil, nutrients, gravity, air, photosynthesis, terrarium, animal consumer, plant consumer, decomposer, mold, bacteria, yeast, organism, food chain, food web, energy transfer, biome
Science inquiry, process, & perspective concepts, facts, & outcomes
Big ideas: Science (claim evidence & reasoning) can be used to understand and explain cause and effect in the world.
Related concepts and facts
- Variables describe properties that change and can be used to explain interactions.
- Relative position describes changes in positions of objects when they are moved relative to a common position.
- Systems are used to describe objects that interact together.
- Interactions can be explained by describing how variables change within a system and how a system interacts with other objects or systems.
- Objects change.
- Change can be observed and recorded as before, during, after.
- Change is observed through properties of the object.
- Change can vary.
- Constancy Somethings stay the same and some things change.
- Constancy can sometimes be observed during a very slow rate of a change process or focusing on a particular property.
- When I experiment I collect observations that describe how different properties change (become variables) when objects and systems interact. This helps me make claims, explain what is happening, and to predict what might happen in the future.
- Inquiry concepts
- Process concepts
- Perspective concepts
Outcome
- Describe how observations are used as evidence to make explanations for cause and effect.
Source
Pedagogical Overview
Each activity is planned as a learning cycle And the entire unit can be thought of as a learning cycle: Exploration of a community begins in the first activity by exploring what learners know about environmental factors and the relationships of living organisms within the certain habitats. Invention is all the activities that develop understanding about communities. And discovery is setting up their own aquarium, exploring a state or national park as a community, or play SimEarth.
Activities Sequence to provide sufficient opportunities for students to achieve the targeted outcomes.
Make sure students have the prior knowledge identified in the background information.
- Activity 1 - What is a natural community?
- Activity 2 - Growing seeds?
- Activity 3 - Seeds & their parts
- Activity 4 - Plants & food or energy
- Activity 5 - Embryos & food or energy
- Activity 6 - Building a terrarium
- Activity 7 - Crickets
- Activity 8 - Cricket food
- Activity 9 - How much do crickets eat?
- Activity 10 - Anole observations
- Activity 11 - How much does an anole eat?
- Activity 12 - How many plants feed an anole?
- Activity 13 - Decomposers
- Activity 14 - Communities
Focus question
Unit focus question:
- What are environmental factors?
- How do plants and animals interact?
- What affect do plants and animals have on each other?
- What is a community?
- Do plants and animals live in a community?
- What would a plant and animal community be?
- How do you get energy to live?
- How do plants and animals get energy to live?
- How do plants grow?
Sub focus questions:
- How does science help sustain healthy communities?
- What is a healthy community?
- How does science provide explanations?
Materials
- Containers to make terrariums, house crickets, anoles, plants, grass seed, bean seeds, cotton balls, small twigs, and other materials to support them. Excellent source for living materials is local pet stores, who will often provide free resources if the materials are labeled with their logo and other information.
- Lab note 1 - What is a natural community?
- Lab note 2 - Growing seeds? Can go on to 3 before 2 is complete
- Lab note 3 - Seeds & their parts Can start 3 before two is complete
- Lab note 4 - Plants & food or energy
- Lab note 5 - Embryos & food or energy
- Lab note 6 - Build a terrarium
- Lab note 7 - Crickets
- Lab note 8 - Cricket food
- Lab note 9 - How much do crickets eat?
- Lab note 10 - Anole observation
- Lab note 11 - How much does an anole eat?
- Lab note 12 - How many plants feed an anole?
- Lab note 13 - Decomposers
- Lab note 14 - Communities
References and other resources
Scoring guides suggestions (rubric)
Communities interdependence (scoring guide)
Top level
- Explains healthy communities depend on the interdependence among organisms with plants being important for turning the sun's energy into living energy, which is the basis of energy for all organisms in a community. Energy originating from the sun and passed from organism to organism along with other nutrients recycled with decomposers.
- Explanation is limited to an energy triangle to show the relationship of plants to plant consumers and animal consumers to plant consumers. May include decomposers.
- Makes an energy chain to show the relationship of a plant to a plant consumer and an animal consumers to that plant consumer. May include decomposers.
Lower level
Lesson Plans
Activity 1 - What is a natural community?
Materials
Focus questions:
- What is a natural community?
- What are environmental factors? (review from environmental packets or unit - light, heat, water, ...)
- How do plants and animals interact?
- What affect do they have on plants and animals?
- Do plants and animals live in a community?
- What would a plant and animal community be?
- How do you get energy to live?
- How do plants and animals get energy to live?
Learning outcomes:
- Create a mind map or model for a natural community.
Suggested procedures overview:
- Put learners in groups, focus their attention, and assess their initial understanding of natural communities and related elements. (plants, animals, decomposers, environmental factors, ...) by having them answer the focus questions in their lab noted.
- Share responses to focus questions.
- Describe highlights of this unit or packet of study.
Exploration -
- Put learners in pairs.
- Ask. Them to discuss the focus questions and begin to jot down their ideas in their lab notes.
- Bring the class together and share answers from pairs or groups. Accept all answers and don't offer additional facts or information, unless there is a health or safety issue.
Invention -
- Have learners draw or write their ideas about a natural community in their lab notes.
- Describe possible highlights of this unit or packet of study.
Discover
As the unit progresses, learners will add information to their mind maps and create additional ones for natural communities.
Activity 2 - Growing seeds?
Materials
- Bean seeds, growing container, soil, light source, water,
- Lab notebook -
Focus questions:
- What do seeds need to grow into healthy plants?
- What is in a seed?
- What do the parts in it look like? Like the adult?
Learning outcomes:
- Experiment to find environmental conditions to benefit plant growth.
Suggested procedures overview:
- Put learners in groups, focus their attention, and assess their initial understanding of conditions for seed germinations and plant growth..
- Develop a plan for growing a bean plant.
- Plant, care for, and report on bean plant growth.
Exploration -
- Put learners in pairs.
- Ask. Them to discuss what seeds need to grow into healthy plants. And jot down their ideas in their lab notes.
- Bring the class together and share answers from pairs or groups. Accept all answers and don't offer additional facts or information, unless there is a health or safety issue.
Invention -
- Write their plan for growing their bean in their lab notes.
- Have them plant bean seeds.
Discover
As the bean grows, they can add information to their lab notes. And generalize their ideas to natural communities.
Activity 3 - Seeds & their parts
Might want to start activity 3 before two is complete
Materials:
- Bean seeds soaked for 30 hours, small plastic probe, forceps, and hand lens.
- Lab note 2
Focus questions:
- What makes a seed?
- What is in a seed?
- What parts of seeds are there?
- What do seeds need to grow into healthy plants?
- What is in a seed?
- What do the parts in it look like? Like the adult?
Learning outcomes:
- Identify parts of a seed: seed coat, cotyledon, & embryo.
- Experiment to find evidence for the purpose of each seed part.
- Explain the seed coat protects the seed from environmental factors.
- Explain the cotyledon is a food source for the embryo.
- Explain the embryo has the information and material to grow into a plant.
Suggested procedures overview:
- Put students in groups, focus their attention, and assess their initial understanding of the focus questions.
- Activity draw seeds, dissect them, make inferences as to the purpose of the different parts.
- Experiment with seed parts to see what will and won't grow.
Exploration
- Put learners in pairs.
- Ask. What are seeds?
- What is in a seed?
- What parts of seeds are there?
- What do you think is the purpose for each part?
- How can we find out?
- Tell. I will give you seeds and equipment to explore them.
- Explore them and draw what you find in your lab notes.
- Provide each group with a soaked bean seed and materials to dissect them.
- Explore and dissect a seed.
- Have learners display what they found.
Invention
- Discuss what they found.
- Ask. Have you heard of these seed parts:
- seed coat
- cotyledon
- embryo (root, leaf, stem)
- Discuss what they think each part does?
- Ask ... What parts or combination of parts seeds need to grow into plant?
- Identify the different possible combinations:
(Set of three objects (whole seed has: seed coat, cotyledon, embryo) have _ combinations?)- seed coat
- cotyledon
- embryo (root, leaf, stem)
- seed coat and cotyledon
- seed coat and embryo
- embryo and cotyledon
- seed coat, embryo, half of cotyledon
- Decide which combinations to test to see if they would grow.
- whole seed
- cotyledon
- one cotyledon & embryo
- embryo
- seed coat
- whole seed without coat
- Set up growth chamber
- Set each part in the growth chamber, label each, water sparingly, and record the growth.
Data
Seed part |
Growth |
|---|---|
| Whole seed | |
| Cotyledon | |
| Seed coat | |
| Embryo | |
| Whole seed without coat | |
| One cotyledon & embryo |
- Continue for two weeks charting and graphing the growth.
Discover
- Share the results:
- Graph the class results.
- Based on the results, answer the following questions.
- Which of the different combinations: have the potential to grow into a plant?
- whole seed
- embryo and two cotyledon
- embryo & one cotyledon
- seed coat
- cotyledon
- embryo (root, leaf, stem)
What part of the seed grows?
What part of the seed doesn’t grow?
What combinations of the seed parts grow?
What is the cotyledon’s function?
What is the seed coat’s function?
How is plant growth effected by the cotyledon’s size?
What is the embryo’s function?
How is plant growth effected by the embryo’s size?
If you were a seed what parts would you want? And why?
Where do plants grow from? All over? Top? Middle? Or bottom?
Activity 4 - Plants & food or energy
Can start 3 before two is complete
Materials:
- Black plant cap, planter, grass seeds, and two seed planters.
- Lab notes -
Focus questions:
- Where do plants get there food or energy?
Learning outcomes:
- Identify light as a source of energy for plants.
Suggested procedures overview:
- Put students in groups, focus their attention, and assess their initial understanding of the focus questions.
- Activity
Exploration
- Put learners in pairs.
- Ask. Where do plants get there food or energy? maybe cotyledon & Hopefully someone includes light!
- Ask. How they might show there is a relationship of plant growth to light?
- Possible procedure:
- Plant equal amounts of grass seeds in two planters.
- Put ½ of the plants in the dark and cover with the plant cap.
- Be careful to keep them in the dark as more than 20 mins. a day of light could change your results.
- Put the other plants in the light.
- Decide when and how to measure and record the health of the plants every day for two weeks. Learners usually want to measure height of the plants. That's okay. However, when they grow beans in the dark and you discuss health of the plant, height probably won't be a good indicator for health ... Fun ...
Data
Group 1 Plants in light |
Measurement or ....... |
|---|---|
| Day 0 | |
| Day | |
| Day | |
| Day | |
| Day | |
| Day | |
| Day | |
| Day |
Group 2 Plants in the dark |
Measurement or ....... |
|---|---|
| Day 0 | |
| Day | |
| Day | |
| Day | |
| Day | |
| Day | |
| Day | |
| Day |
Invention
- Share results periodically and after two weeks.
- Ask. Based on your group data and the class data what are your conclusions?
- Vocabulary to use in your conclusion: light, energy, food, Optional - photosynthesis, water, nutrients and minerals.
- Discover, plants use energy from light to grow. They make food. Optional Photosynthesis makes glucose with light, water, & carbon dioxide.
- If you put a plant in the dark, it would not be able to make its own food and then not grow..
- The plant in the light (control ) will have the light it needs to grow, along with all the other variables, that are controlled (made the same).
Activity 5 - Embryos & food or energy
Materials:
- Black plant cap, planter, beans, and two seed planters.
- Lab notes -
Focus questions:
- Where do seeds get there food or energy?
Learning outcomes:
- Identify cotyledon as a source of energy.
- Identify light as a source of energy for plants.
Suggested procedures overview:
- Put students in groups, focus their attention, and assess their initial understanding of the focus questions.
- Activity
Exploration
- Put learners in pairs.
- Ask. Where do embryos get there food or energy? cotyledon &
- Hopefully someone includes light!
- Ask. How they might show there is a relationship of embryo and plant growth to cotyledons and amount of light?
- Question: How do cotyledons and light effect the growth of embryos and plants?
- What might we do to find out?
- Suggestion:
- Grow (germinate) some bean seeds in the dark for 5-7 days.
- Then move ½ to the light.
- Remove the cotyledons from ½ of the plants in both the light and dark.
- Predict what you think will happen.
- Group 1 Plant in light with cotyledon
- Group 2 Plant in light without cotyledon
- Group 3 Plant in dark with cotyledon
- Group 4 Plant in light without cotyledon
- Record what happens.
Data
Group 1 Plant in light with cotyledon |
Measurement or ....... |
|---|---|
Group 2 Plant in light without cotyledon |
Measurement or ....... |
|---|---|
Group 3 Plant in dark with cotyledon |
Measurement or ....... |
|---|---|
Group 2 Plant in dark without cotyledon |
Measurement or ....... |
|---|---|
- Groups share results for class.
- Graph your results and the class average.
- Which plants did the best?
- Which plants did the worst?
Invention
- Suggested vocabulary to use: cotyledon, photosynthesis, light, water, nutrients and minerals
- Cotyledons provide plants ...
- Plants make food from light. Therefore, plants need light to grow when
- Plants can store food in What do cotyledons do for plants?
- When do plants need light to grow?
- Can plants store food?
- Where do they?
- Conclusions:
Discovery
Where else do plants store energy?
Brain busters;
- What would happen, now, if you switched the places of your plants?
- If plants store food in different plant parts, how might you prove it with a dandelion root, clove, and geranium stem?
- Plant some bean seeds and keep a weekly diary of them for 9 weeks.
- Germinate different types of seeds and draw and label them over time.
- Get 100 seeds all the same and put them in a germination chamber and find what % (percent) will germinate? Corn, beans, oats, wheat and milo.
- Plan an experiment to determine what happens when leaves are removed from plants.
- Make up your own.
Activity 6 - Build a terrarium
Materials
Focus questions:
- What is a terrarium?
- How would you build one?
- What temperature ranges do you think best?
- What amount of water should be provided?
- How much light should be provided?
- Should organisms be included?
- How many and what combinations?
Learning outcomes:
- Learners
Suggested procedures overview:
- Put students in groups, focus their attention, and assess their initial understanding of the focus questions.
- Activity
Exploration
- Form groups.
- Ask. What is a terrarium?
- How would you build one?
- Plan and design a terrarium.
- List the organisms you want to include, describe the organism and what environmental factors you will provide for it. May want to make suggestions based on availability of organisms.
- Give a description of how much water, light, and other factors you will provide for it.
- Draw, map, and label the location and number of seeds and plants in your terrarium.
- Record information about other factors and conditions of the terrarium.
- Then record the changes that happened in the terrarium on a regular basis.
Invention
- Observe the terrariums daily and record changes.
- After a few weeks, think about introducing animals to your terrarium?
- Before you do list what kinds of information you might record about the system. Temperature, amount of moisture, kinds and numbers of plants and other organisms, and other information that might be helpful. What about crickets?
Discover
Activity 7 - Crickets
Materials:
- Crickets (pet centers have them and can give care tips)
- Materials to build dry cricket houses.
- Lab notes -
Focus questions:
- What do crickets need to survive?
Learning outcomes:
- Describe three needs of crickets for their survival and how they are provided.
- how crickets get their energy.
- List what crickets eat and how much.
Suggested procedures overview:
- Put students in groups, focus their attention, and assess their initial understanding of the focus questions.
- Activity
Exploration
- Organize learners into groups.
- Give each group a clear container with crickets to observe and draw what they look like.
- Tell. Observe and draw what the cricket looks like before you put them in the terrarium.
- After you put them in the terrarium you want to see what they do, their behavior.
Background information: Some type of crickets need very little water and live in dry places. They must have a dry place to live or they will get a disease and die. Therefore you must provide a dry area at least 1 cm off the ground for the cricket to go and a place for its food to stay dry. If you think their food has gotten damp you should change it daily.
- Do crickets need water? If so what body parts do they use to get it?
- Do crickets need food? How do they eat? What do they eat? How much?
- Heat? Do they spend time in light or like shade?
- What animals prey on them?
Invention
- Share observations of characteristics of crickets.
- Can you discover the difference between a male and female cricket? Female has an ovipositor.
- Did you observe any different actions between a male and female? A Female will insert her ovipositor into the soil
- What other interactions were observed?
- soil
- light
- water
- crickets
- plants
- seeds
- Ask. What do they eat?
- How much do they eat?
- How could we find out?
Discover
Experiment to discover what crickets eat and how much ... next activity.
Activity 8 - Cricket food
Materials
Cricket house, cricket feeder, cotton roll, cricket, stick to climb on, and some soil. Crickets eat fruits, vegetables, and sometimes dead animals for protein. For simplicity, I've used small seeds (mustard) to make later calculations easier than figuring out how many apples a cricket eats.
Focus questions:
- What do crickets eat?
Learning outcomes:
- Plan an experiment to discover what crickets eat and how much.
- Describe what crickets eat.
Exploration
- Organize learners into groups and pairs.
- Ask. What do crickets eat?
- Ask. How could we find out?
- Lead learners to a procedure similar to: Isolate a cricket with different things they might eat.
- Possible procedure:
- Select a clear container and lid to use as a cricket house.
- Select various types of food to test to see if crickets eat them.
- Wet a cotton roll with four drops of water and stick it inside the dry cricket house stuck up off the floor on the side. Use a very small amount of tape so the cricket doesn’t eat it instead of the food you provide).
- Put 1 cm of dry soil on the bottom of the cricket house.
- Insert twigs or sticks for the cricket to climb on.
- Observe for at least 24 hours and record results.
- Date started: -- Date finished:
- Food provided and amount:
- Food eaten and amount:
- What did the crickets eat the most?
- List the top organisms eaten from the class list.
- What type of food do crickets eat?
- Conclusions:
- How much do crickets eat?
- Groups display food provided and amounts eaten.
- Display group results for the class to see and summarize.
Invention
- Regroup as a class and share results:
- Discuss experiment.
- Identify what crickets eat and don't eat.
Discover
- How much does a cricket eat? Next activity..
Activity 9 - How much do crickets eat?
Materials
- Cricket house, cricket feeder, cotton roll, cricket, stick to climb on, and some soil.
- Lab notes -
Focus questions:
- What do crickets eat?
- How much do crickets eat?
Learning outcomes:
- Plan an experiment to discover how much a cricket eats.
- Describe how much a cricket eats in a day, week, life time.
Exploration
- Organize learners into groups and pairs.
- Ask. how much does a cricket eat?
- Ask. How could we find out?
- How would you plan an experiment to discover how much a cricket eats?
- Suggestions:
- If you use all different sizes of seeds it would be hard to measure how much they ate. So limit the food to a small seed of the same kind and put enough food in the cricket houses to last each cricket four days (maybe about 25 mustard seeds for a cricket is a good choice).
- Remember what you learned about the type of environment crickets like in the last experiments.
- List the food quantities and record what has been eaten after 1 or 2 days.
- Set up and conduct experiment.
- Display results for all to see.
Invention
- Regroup as a class and share results:
- Discuss experiment to identify how much a crickets eats in a day, two days, a week, month, lifetime.
- Discuss results as to where the energy originated and its use in a community.
Discover
- What animals eat crickets?
- How many crickets would that animal eat in a day, week, month, lifetime?
Activity 10 - Anole observations
Materials
- Anoles -
- Anoles need to be fed once to twice a day depending upon the amount of food each can eat at one time. There should eat two - five live crickets in their daily diet. They should be fed in the evening since they are nocturnal and will use more energy at night.
- Lab notes -
Focus questions:
- What is an anole?
Learning outcomes:
- Describe characteristics of an anole.
Exploration
- Organize learners into groups and pairs.
- Ask. How should they observe the anole? Review observational procedure for crickets in activity 6.
- Observe anole and record information.
- Share results for class to see.
Invention
- Regroup as a class and discuss results, identify characteristics and discuss how they might fit into the terrarium community.
- What do they need to survive?
- How are these needs met or not met?
- Discuss results as to where the energy originated and its use in a community.
Discover
Ask. What information do they need in a plan to discover how many crickets an anole eats? see next activity
Activity 11 - How much does an anole eat?
Materials
- Anoles -
- Anoles need to be fed once to twice a day depending upon the amount of food each can eat at one time. They should eat two - five live crickets in their daily diet. They should be fed in the evening since they are nocturnal and will use more energy at night.
- Lab notes -
Focus questions:
- How much do anoles eat?
Learning outcomes:
- Plan and experiment to find how much an anole eats in a day, week, month, lifetime.
Exploration
- Organize learners into groups and pairs.
- Ask. What information do they need in a plan to discover how many crickets an anole eats?
- Possible suggestions: materials, procedure, what data to collect and how ...
- Plan and conduct an experiment.
- Share results for class to see.
Invention
- Regroup as a class, discuss results, and determine how many crickets an anole eats ...
Discover
Plan how to discover how to find out what and how much other organism eat.
Activity 12 - How many plants feed an anole?
Materials
- All completed lab notes
- Lab notes -
Focus questions:
- How many seeds does it take to feed an anole?
Learning outcomes:
- Describe how many seeds are needed for a healthy anole.
Exploration
- Organize learners into groups and pairs.
- Ask. How many seeds are needed to feed an anole?
- Let learners discuss possible answers.
Invention
- Regroup as a class and share suggestions.
- If learners didn't suggest to use their data from what crickets eat and what anoles eat, suggest it.
- Then ask what other information is needed?
- How long crickets live (90 days outside, maybe a year as a pet),
- How many seeds a plant makes (mustard plants can grow thousands of seeds, however the average wild plant grows about 600 a season),
- How many crickets an anole eats (2-5 cricket a day) in a year or life time?
- If a cricket lives 90 days and a mustard plant matures in about the same time. Then using 90 days, calculate how many plants are needed to feed an anole.
| Plant | Plant consumer | Animal consumer |
|---|---|---|
| Mustard | Cricket | Anole |
Ask. How does the number of organisms compare from organism to organism?
Discover
Using the information collected from observations of your terrarium system, list the plants the crickets ate?
How many plant consumers were eaten?
What was the plant consumer’s food?
From your calculations what was the average number of seeds the plant consumers consumed?
What was the plant’s food?
Did the animal consumer use the plants for their food?
How many seeds or plant parts does it take to feed the animal consumer for 4 days?
Conclusions: (Use these vocabulary words in your conclusion: animal consumer, plant consumer, and plant.)
Make an energy chain for the three organisms.
seed ---- > cricket ---- > anole
Make an energy triangle by including everything the crickets ate.
Draw arrows to show the direction of the energy transfer.
Give an other example of a food chain that has each of the following:
Plant, Plant consumer, and Animal consumer
In the following food chain:
seed ---- > cricket ---- > anole
What would happen if the crickets were removed from the chain?
What would happen, in the same chain, if there were twice as many salamanders?
How many seeds does it take to feed a anole for a year?
Activity 13 - Decomposers
Materials
- burial vial, (seal able clear container) dead organisms, sand or dirt and water.
- Materials or garbage to bury outdoors
- Lab notes -
Focus questions:
- What happens to dead organisms?
- What effects the rate of decomposition?
Learning outcomes:
- Explain decomposition and why it is an important part of a community.
Exploration
- Organize learners into groups and pairs.
- Ask. What happens to dead organisms?
- What effects the rate of decomposition?
- Describe how you might demonstrate it?
- Possible procedures #1
- Take the burial vial, one you can see through, and place the dead organism into the vial with the sand or dirt.
- If you are answering question 2 then you will have to vary the amounts of water and use more than one burial vial.
- Set the vials aside and record what happens for the next four or five weeks.
- **** WARNING ****
**** keep the vials sealed. ****
****Breathing the gases in the vials may be HARMFUL****
- Possible procedures #2
- Have learners bring items that are considered garbage. collect hem and take them outdoors and bury them 8 - 12 inches deep. Deep enough that other animals will not dig them up. Leave them there for several months. I used to bury them in September and dig them up in April.
- Possible procedure #3
- Before you open the yeast cut the fruit into small pieces (2-3 cm). If there are any brown or black spots on the fruit cut them off and discard them. Then place ½ into the clean containers, seal them, label them and set them aside. Take the other half of the fruit and sprinkle yeast onto them into the other containers. Label them and set them with the first group. Look at them for the next 4-6 days and record the data below.
- Results
Invention
- Discuss
- What changed?
- How did it change?
- What changed most?
- What caused the changes?
- What causes the brown or black spots on fruit that most people call bruises?
- Did some change without the yeast?
- If so what do you think caused them?
- What variable do you think would effect the yeast’s growth?
- What did the yeast use for energy?
- Where would yeast fit on the community chart?
- What good is yeast?
- Conclusions about decomposers.
Discover
How are decomposers interdependent with other organisms in a community?
Activity 14 - Communities
Materials
- All completed lab notes
- Lab notes -
Focus questions:
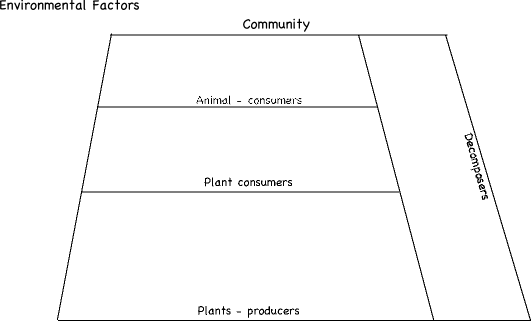
- How are plants, plant consumers, animal consumers, & decomposers interdependent within their community?
Learning outcomes:
- Explain how are plants, plant consumers, animal consumers, & decomposers are interdependent within their community?
Exploration
- Organize learners into groups and pairs.
- Ask. How are plants, plant consumers, animal consumers, & decomposers interdependent within your terrarium community?
- Let groups discuss and ask them to use the diagram below to represent their ideas.
- Share results for class to see.
Invention
- Are the organisms in their terrariums in the right box?
- Did they represent the energy transfer for the organisms to show the interdependence of the organisms. (Could use arrows to show.)
- Was there any mold, fungus, or microorganisms in their terrarium to include as decomposers?
- Is it a food chain or food web?
- Tell. You are also aware that plants and animals need more from their environment than food.
- What are the other materials they need? environmental factors
- Are they living or nonliving? Biotic or abiotic?
- Where would you put them on you model? Since they are nonliving objects they should not be inside the community box . So they need to be placed outside the community box. Arrows can put to point to the organism that use them.
- Edit the community model and discuss how it can be used as a model for outside communities.
Discover
- Explain: When a community of organisms lives in a certain area it is often called a biome. There are several types of biomes. Some of them are desert biome, forest biome, pond biome, city biome, prairie biome, jungle biome, river biome, farmland biome, tundra biome, marshland biome, and ocean biome.
- Each group select a different biome and fill out a community chart for that biome to share with the class.
- Share and discuss.
- Mention an ecosystem includes (abiotic) environmental factors and biotic (community with its organisms) and models how they interact. That can be studied in the Ecosystem packet or unit ... next ... year?
Lab Notebook for activities
Lab notes 1 - What is a natural community?
Materials
- Lab notes
Directions
Discuss the following focus questions with a partner or in a group.
Focus questions:
- What is a natural community?
- What are environmental factors?
- How do plants and animals interact?
- What affect do they have on plants and animals?
- Do plants and animals live in a community?
- What would a plant and animal community be?
- How do you get energy to live?
- How do plants and animals get energy to live?
Create a mind map for a natural community. Include any of the following words that you might find in your selected community.
Plant, animal, predator, prey, population, organism, barrier, dispersal, plant eater, animal eater, decomposer
Lab notes 2 - Growing beans
Materials
- Bean seeds, water, containers, light source, temperature control, soil or other substance
Challenge
List variables that might cause plants to grow better.
Create and write a plan to grow a healthy bean plant.
What could be recorded every day as a measure of a bean plant's health?
Describe how it can be recorded in the table below.
| Date | Data | Other |
|---|---|---|
Is there a way to graph the data? If there is, graph it.
Lab notes 3 - Seeds & their parts
Materials:
- Bean seeds soaked for 30 hours, small plastic probe, forceps, and hand lens.
- Lab note
Challenge
- What are seeds?
- What makes a seed?
- What is in a seed?
- What parts of seeds are there?
- What do you think is the purpose for each part?
Dissect a bean seed, draw it, and its parts.
Label
- seed coat
- cotyledon
- embryo (root, leaf, stem)
What do you think is the function of each part?
What parts or combination of parts seeds need to grow into plant?
Identify the different possible combinations:
Set up growth chamber
Set each part in the growth chamber, label each, water sparingly, and record the growth for two weeks and graph the growth.
Data
Seed part |
Growth |
|---|---|
| Whole seed | |
| Cotyledon | |
| Seed coat | |
| Embryo | |
| Whole seed without coat | |
| One cotyledon & embryo |
Graph the class results.
Based on the results, answer the following questions
Which of the different combinations: have the potential to grow into a plant?
- whole seed
- embryo and two cotyledon
- embryo & one cotyledon
- seed coat
- cotyledon
- embryo (root, leaf, stem)
What part of the seed grows?
What part of the seed doesn’t grow?
What combinations of the seed parts grow?
What is the cotyledon’s function?
What is the seed coat’s function?
How is plant growth effected by the cotyledon’s size?
What is the embryo’s function?
How is plant growth effected by the embryo’s size?
If you were a seed what parts would you want? And why?
Where do plants grow from? All over? Top? Middle? Or bottom?
Lab notes 3 - Plants & food or energy
Materials
- grass seeds, two growing containers
Challenge
Where do plants get there food or energy?
Suggestions for a procedure:
- Plant equal amounts of grass seeds in two planters.
- Start with both in the dark till they germinate.
- Then put ½ of the plants in the dark and cover with a black opaque plant cap.
- Be careful to keep them in the dark as more than 20 mins. a day of light could change your results.
- Put the other plants in the light.
- Measure and record the height of the plants everyday for two weeks.
Data
Group 1 Plant in light with cotyledon |
Measurement or ....... |
|---|---|
Group 2 Plant in light without cotyledon |
Measurement or ....... |
|---|---|
Group 3 Plant in dark with cotyledon |
Measurement or ....... |
|---|---|
Group 2 Plant in dark without cotyledon |
Measurement or ....... |
|---|---|
Graph your results and the class average.
Which plants did the best?
Which plants did the worst?
Summary
Vocabulary to use in your conclusion: cotyledon, photosynthesis, water, nutrients and minerals.
Cotyledons provide plants
Plants make food from light. Therefore, plants need light to grow when
Plants can store food in
Brain busters;
- What would happen, now, if you switched the places of your plants?
- If plants store food in different plant parts, how might you prove it with a dandelion root, clove, and geranium stem?
- Plant some bean seeds and keep a weekly diary of them for 9 weeks.
- Germinate different types of seeds and draw and label them over time.
- Get 100 seeds all the same and put them in a germination chamber and find what % (percent) will germinate? Corn, beans, oats, wheat and sorghum.
- Plan an experiment to determine what happens when leaves are removed from plants.
- Make up your own.
Lab notes 4 - Plants & food or energy
Materials:
- Black plant cap, planter, grass seeds, and two seed planters.
- Lab notes -
Challenge
Where do plants get there food or energy?
Possible procedure:
- Plant equal amounts of grass seeds in two planters.
- Put ½ of the plants in the dark and cover with the plant cap.
- Be careful to keep them in the dark as more than 20 mins. a day of light could change your results.
- Put the other plants in the light.
- Decide when and how to measure and record the health of the plants every day for two weeks. Learners usually want to measure height of the plants. That's okay. However, when they grow beans in the dark and you discuss health of the plant, height probably won't be a good indicator for health ... Fun ...
Results
Group 1 Plants in light |
Measurement or ....... |
|---|---|
| Day 0 | |
| Day | |
| Day | |
| Day | |
| Day | |
| Day | |
| Day | |
| Day |
Group 2 Plants in the dark |
Measurement or ....... |
|---|---|
| Day 0 | |
| Day | |
| Day | |
| Day | |
| Day | |
| Day | |
| Day | |
| Day |
Conclusions
Vocabulary to use in your conclusion: light, energy, food, Optional - photosynthesis, water, nutrients, and minerals.
Lab notes 5 -
Materials:
- Black plant cap, planter, beans, and two seed planters.
- Lab notes -
Focus questions:
- Where do seeds get there food or energy?
Learning outcomes:
- Identify cotyledon as a source of emery.
- Identify light as a source of energy for plants.
Suggested procedures overview:
- Put students in groups, focus their attention, and assess their initial understanding of the focus questions.
- Activity
Exploration
- Put learners in pairs.
- Ask. Where do embryos get there food or energy? cotyledon &
- Hopefully someone includes light!
- Ask. How they might show there is a relationship of embryo and plant growth to cotyledons and amount of light?
- Question: How do cotyledons and light effect the growth of embryos and plants?
- What might we do to find out?
- Suggestion:
- Grow (germinate) some bean seeds in the dark for 5-7 days.
- Then move ½ to the light.
- Remove the cotyledons from ½ of the plants in both the light and dark.
- Predict what you think will happen.
- Group 1 Plant in light with cotyledon
- Group 2 Plant in light without cotyledon
- Group 3 Plant in dark with cotyledon
- Group 4 Plant in light without cotyledon
- Record what happens.
Data
Group 1 Plant in light with cotyledon |
Measurement or ....... |
|---|---|
Group 2 Plant in light without cotyledon |
Measurement or ....... |
|---|---|
Group 3 Plant in dark with cotyledon |
Measurement or ....... |
|---|---|
Group 2 Plant in dark without cotyledon |
Measurement or ....... |
|---|---|
- Groups share results for class.
- Graph your results and the class average.
- Which plants did the best?
- Which plants did the worst?
Invention
- Suggested vocabulary to use: cotyledon, photosynthesis, light, water, nutrients and minerals
- Cotyledons provide plants ...
- Plants make food from light. Therefore, plants need light to grow when
- Plants can store food in What do cotyledons do for plants?
- When do plants need light to grow?
- Can plants store food?
- Where do they?
- Conclusions:
Discovery
Where else do plants store energy?
Brain busters;
- What would happen, now, if you switched the places of your plants?
- If plants store food in different plant parts, how might you prove it with a dandelion root, clove, and geranium stem?
- Plant some bean seeds and keep a weekly diary of them for 9 weeks.
- Germinate different types of seeds and draw and label them over time.
- Get 100 seeds all the same and put them in a germination chamber and find what % (percent) will germinate? Corn, beans, oats, wheat and sorghum.
- Plan an experiment to determine what happens when leaves are removed from plants.
- Make up your own.
Lab notes 6 - Build a terrarium
Materials
Challenge
Make a terrarium?
Plan & design
Hints
- How would you build one?
- What temperature ranges do you think best?
- What amount of water should be provided?
- How much light should be provided?
- Should organisms be included?
- Kinds and numbers of plants and other organisms, and other information that might be helpful.
- How many and what combinations?
Plan & design notes
Observe the terrariums daily and record changes
Lab notes 7 - Crickets
Materials
- Crickets, terrarium, materials to build a cricket house
- Background information: Some type of crickets need very little water and live in dry places. They must have a dry place to live or they will get a disease and die. Therefore you must provide a dry area at least 1 cm off the ground for the cricket to go and a place for its food to stay dry. If you think their food has gotten damp you should change it daily.
Procedure
- Observe and draw what the cricket looks like before you put them in the terrarium.
- Plan a cricket house or place for crickets.
- After you put them in the terrarium you want to see what they do, their behavior and how they meet their needs. Ideas to explore:
- List interactions of your crickets with their environmental factors and community (soil, light, water, crickets, plants, seeds…).
- Do crickets need water? If so what body parts do they use to get it?
- Do crickets need food? How do they eat? What do they eat? How much?
- Heat? Do they spend time in light or like shade?
- What animals prey on them?
Challenge
Cricket house or place for crickets.
Cricket picture
Cricket observation notes!
Lab notes 8 - What do crickets eat?
Materials
- Cricket house, cricket feeder, cotton roll, cricket, stick to climb on, and some soil. Crickets eat fruits, vegetables, and sometimes dead animals for protein. For simplicity, I've used small seeds (mustard) to make later calculations easier than figuring out how many apples a cricket eats.
- Lab notes -
Challenge
What do crickets eat?
- Date started: -- Date finished:
- Food provided and amount:
- Food eaten and amount:
- What did the crickets eat the most?
- List the top organisms eaten from the class list.
- What type of food do crickets eat?
- Conclusions:
- How much do crickets eat?
Plan
Results
Lab notes 9 - How much do crickets eat?
Materials
- Cricket house, cricket feeder, cotton roll, cricket, stick to climb on, and some soil.
- Lab notes
Challenge
What do crickets eat? And how much do they eat?
Plan
Lab notes 10 - Anole observations
Materials
- Anoles need to be fed once to twice a day depending upon the amount of food each can eat at one time. There should eat two - five live crickets in their daily diet. They should be fed in the evening since they are nocturnal and will use more energy at night.
- Lab notes -
Challenge
Describe an anole and it's interacts within its environment and community.
Lab notes 11 - How much does an anole eat?
Materials
- Anoles -
- Anoles need to be fed once to twice a day depending upon the amount of food each can eat at one time. They should eat two - five live crickets in their daily diet. They should be fed in the evening since they are nocturnal and will use more energy at night.
- Lab notes
Challenge
Plan
Activity 12 - How many plants feed an anole?
Materials
- Lab notes
Challenge
How many plants does it take to feed an anole? (hint: think seeds.)
Results
| Plant | Plant consumer | Animal consumer |
|---|---|---|
| Mustard | Cricket | Anole |
Conclusions (Use these vocabulary words in your conclusion: animal consumer, plant consumer, and plant.)
Make an energy chain for the three organisms.
seed ---- > cricket ---- > anole
Make an energy triangle by including everything the crickets ate.
Draw arrows to show the direction of the energy transfer.
Give an other example of a food chain that has each of the following:
Plant, Plant consumer, and Animal consumer
Lab notes 13 - Decomposers
Materials
- burial vial, (seal able clear container) dead organisms, sand or dirt and water.
- Materials or garbage to bury outdoors
- Lab notes
Challenge
What happens to dead organisms?
What effects the rate of decomposition?
- Possible procedures #1
- Take the burial vial, one you can see through, and place the dead organism into the vial with the sand or dirt.
- If you are answering question 2 then you will have to vary the amounts of water and use more than one burial vial.
- Set the vials aside and record what happens for the next four or five weeks.
- **** WARNING ****
**** keep the vials sealed. ****
****Breathing the gases in the vials may be HARMFUL****
- Possible procedures #2
- Bring selected items, that are considered garbage. Select from what everyone brings, take them outdoors, and bury them 8 - 12 inches deep. Deep enough that other animals will not dig them up. Leave them there for several months. Other classes buried them in September and dug them up in April.
- Possible procedure #3
- Fruit. Cut the fruit into small pieces (2-3 cm). If there are any brown or black spots on the fruit cut them off and discard them. Then place ½ into the clean containers, seal them, label them and set them aside. Take the other half of the fruit and sprinkle yeast onto them and seal them in the other containers. Label them and set them with the first group. Look at them for the next 4-6 days and record the data below.
What changes are there?
How did they change?
What changed most?
What caused the changes?
What variable effect the changes?
What did the decomposers use for energy?
Where would yeast fit on the community chart?
What good are decomposers?
Conclusions about decomposers.
How are decomposers interdependent with other organisms in a community?
Lab notes 14 - Communities
Materials
- All completed lab notes
- Lab notes -
Challenge
Use the diagram below to make a model to explain how plants, plant consumers, animal consumers, & decomposers are interdependent within their community.