Measurement as an observable property: linear, volume, mass, temperature, & area
Math & science for primary grades - activity & lesson plan
- Introduction
- Big ideas, concepts, facts, & outcomes
- Process - inquiry concepts, facts, & outcomes
- Perspectives
- Pedagogical overview
- Unit activities sequence
- Resources and materials
- Scoring guide suggestions
- Lesson plans
- Lab Notes for activities
- Support materials
- Picture of an acre
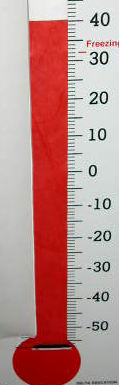
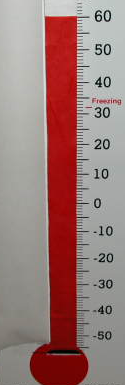
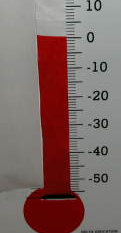
- Picture of a Thermometer C - F
- Clock pictures
- Measurement of rods
- Measurements of objects pictures
- Thermoeter reading pictures
Introduction
This page is a plan to facilitate a review and develop a deeper understanding of measurable properties, how to measure them, and use measurements to make better decisions.
This sequence introduces standard and metric measurement. It includes standard units to measure length, weight, fluid volume, area, and temperature. Also, how to use the appropriate tools in different situations to measure how objects change.
Planning information
Background information:
This plan is designed for learners who have the following prior knowledge:
Related study topics:
Big ideas, concepts, facts, and outcomes
Big ideas
Related concepts and facts
- Better decisions are made when information is verified before being considered accurate and used to reason and develop explanations and models to understand the world and make decisions.
- People make better decision when they understand and consider the positive and negative influences that effect their decision making.
Outcome
Determine an appropriate manner to collect measurements, which are accurate for the task and decisions they are making.
Processes, Inquiry, & cross cutting skills to enhance science literacy & math dimension of measurement
Big ideas: Properties of objects are determined by the elements from which they are made. Properties can remain constant or change. Which can be observed and compared. One process of comparison is measurement.
Measurement is the process of comparing one object to another object. Usually to determine its relative size. To better communicate the results of this process we can use a standard unit calibrated on an object, instrument, or device that is used for comparing the standard unit to an object of unknown size.
- Properties are used to identify objects, as variables in experiments, operational definitions, and explanations.
- Properties of matter include: color, texture, size, shape, mass, volume, density, temperature, chemical, energy, states of matter (solid, liquid, gas, plasma) and the ability to interact with other objects.
- Properties are identified with observation and can be measured with scientific tools and compared to a standard unit (linear, time, temperature, mass, area, volume, and density)
Related concepts and facts
- Linear measurement is the measurement between two points.
- Linear measurement standard units are cm, m, km, inch, foot, yard, and mile.
- A meter tape can be used for linear measurement.
- Temperature measures hot and cold.
- A thermometer is used to measure temperature.
- Degrees in Celsius and Fahrenheit are standard units of temperature.
- A thermometer goes up when the temp goes up, if the temperature goes down, the thermometer goes down.
- Volume standard units are ml, liter, pint, quart, and gallon. Volume measures the space an object occupies.
- Mass standard units are g, kg, pounds, ounces, and tons.
- Mass is the measure of how much matter is in an object or system.
- Measurements can be compared.
Outcome
- Determine an appropriate manner to collect measurements, which are accurate for the task and decisions they are making.
Perspectives -
Big ideas: Science and mathematics can help us solve everyday problems.
Related concepts and facts
- Measurement helps us to understand change.
- Measurement helps us communicate more accurately.
- Measurement helps us make tools and other objects.
Outcome
- Explain how measurement is an important process for science, math, and everyday life.
Pedagogical Overview
Activities Sequence to provide sufficient opportunities for students to achieve the targeted outcomes.
Make sure learners have the prior knowledge identified in the background information.
Focus question
Unit focus question:
When we observe things (object & events) how do we know if it changes?
Sub focus questions:
- What are the observable properties of an object?
- What tools can be used to measure the observable properties of an object?
- How can changes in the earth and sky be measured?
- What benefit does measurement have in real life situations?
Resources & Materials
- The First Straw
- Take Me To Your Liter
- Wow Water
- Weight Watching
- The Third Degree
- Tempting Temps
- Rocks
- Putting It All Together
- Picture of an acre - Add picture of a square mile that can fit 640 football fields.
- Picture of a Thermometer C - F
- Clock pictures
- Measurement of rods
- Measurements of objects pictures
- Thermoeter reading pictures
Scoring guides suggestions (rubric)
See in lesson plans for each activity
Lesson Plans
Activity 1 - The First Straw
Materials
- How Long Is It - lab sheet/student,
- Meter tape, 100-cm/student or group,
- Enough straws of different lengths (can cut straws to different lengths) so each learner has one,
- Transparent tape,
- Scissors,
- Crayons/colored marking pens
Focus questions
- How big is your table?
- How do you tell others the size of the table?
- If we wanted to see if it fit in a space, without moving it, how could we?
Learning outcomes:
- Learners will measure a table top with nonstandard and standard measurements.
Suggested procedures overview:
- Put learners in groups, focus their attention, and assess their initial understanding of the focus questions.
- Have learners measure a table with a straw (distribute different lengths of straws among the students).
- Measure length with in cm with a meter tape.
- Record information on student lab sheets.
Scoring guide for linear measurement
Top level
- Carefully place the measuring device at a starting point, accurately iterates it (if necessary) and counts units from the starting point to the ending point. Deals with the last unit by rounding or making it a fraction.
- Carefully place the measuring device at a starting point, accurately iterates it (if necessary) and counts units from the starting point to the ending point. Notices the last part isn't a unit, but unsure what to do.
- Paces the measuring device near a starting point. Miss counts, sloppy iteration (if necessary) and misses the starting point and the ending point by a significant amount. Not concerned about the last unit not being a total unit.
Lower level
Exploration
- Ask. How can you measure your table?
- Form groups and give them a straw (so there are at least three different lengths) to use as a measuring tool.
- Have them measure the length and width of tables with straws and record their results. (Observe technique learners use to measure table)
- Bring the them back together as a class.
- Tell. Share your measurements by writing it on the board.
Invention
- Ask about the measurements.
- Discuss why they are different? Different lengths of straws and some may have rounded up and others rounded down because the length is so long.
- Show the students a meter tape (with centimeters marked).
- Ask. How are they different than the straws? They are all the same length (non standard measurement) and they are smaller.
- Ask. Can you measure the same table with it?
- Tell. Measure the table and record the results.
- Tell. Share your measurements by writing it on the board.
- Have them compare their results and discuss the differences. The result, most probably will not be the same. Focus on the results as being closer than the measurements with the straws. Develop the idea of standard unit now and later work on accuracy.
- Ask. Why do scientists want to use a meter tape to measure? Accuracy to measure change and communicate better.
- Introduce the term standard unit of measure.
- Ask. Why it is important to have standard measurement? To have a standard unit that all people understand so we can communicate better. Point out that if you want to know if a table will fit a certain space using a non standard unit (arm length, back to back foot measurement, ... ) can provide enough accuracy to get the job down. It's when you need to communicate to another person, the standard unit becomes necessary. Buy carpet, table cloth to fit the table, ...
- Ask. What kind of measurement a carpenter uses on their tape measure?
- Ask. How to measure a person’s height? Accept all answer.
- Ask. How to weight a person? Accept all answer.
- Ask. How to measure the amount of pop in a bottle? … Accept all answer.
- Tell. A measuring tape is used to measure linear measurement: the distance between two points.
- Ask. What are examples and non examples of linear measurement?
- Randomly mention things to measure and ask if they would measure those items with a tape or not.
- If students need practice finding the numbers on a tape, put them in pairs and randomly call out certain numbers for them to locate on the meter tape.
- Have the students measure a large variety of items with their meter tape, recording information on a How Long Is It lab sheet.
- Have students compare measurements.
- Discuss for instance why one person’s foot may have measured longer than the next person.
- Ask. How people use measurement outside of school?
- Ask. How important is it to be accurate? Depending on the age of your students you may or may not want to focus on accuracy. Young children have a difficult time accurately lining up rulers from start to finish and like with the straws end to end from start to finish. If your students are ready to proceduralize measuring then have them discuss and you can write a procedure to measure linearly.
- Ask. Why is a standard unit of measurement is so important? To communicate measurement accurately.
Discover
Could use other objects to measure other objects in the room. Learner's shoes to measure carpet or room length & width.
Ask. Which shoes would give the highest measurement? Which would be the lowest?
See if they can invent a indirectly proportional relationship. One goes up the other goes down.
Activity 2 - Take Me To Your Liter
Materials
- For each group of four learners:
Vials (assorted sizes of small containers to use as non standard units), 100ml graduated cylinder, 50-ml Syringe, Plastic cup, Basin, 1-L container (may use a liter pop bottle), Soda Can, "Full Volume" lab sheet, "Volumes in My Life" lab sheet
- For the Class:
1 Spoon 1-ml, 1 Beaker, 1-L, 2 Pitchers for water, Paper towels and or bath towels
Focus questions
- How do we know how much a container holds?
Learning outcomes:
- Describe how to measure capacity or volume of containers.
Suggested procedures overview:
- Put learners in groups, focus their attention, and assess their initial understanding of the focus questions.
- Have learners measure a container with a different container (distribute volumes of cups among the students).
- Measure volume in ml with a graduated cylinder.
- Record information on student lab sheets.
Scoring guide for
Top level
- Carefully fill the measuring device without spilling and look at the marks level with the surface to be more accurate and repeat until all has been measured. May use tally marks for larger quantities to keep count.
- Pour and count. Miscount, liquid levels are above and below the measured indicator on the measuring device. may spill some amounts.
Lower level
Exploration
- Hold up a clear plastic cup.
- Ask. How do we know how much this container holds?
- Ask. Do you know what the word capacity means?
- Tell. Let's find the capacity of the cup.
- Hold up a plastic vial and say. A vial can be a measuring tool.
- Tell. Use it to measure the capacity of the cup.
- (Secretly give the groups different sized vials randomly)
- Tell. Use the vial to measure how many vials it takes to fill the cup.
- Tell. Share your measurements by writing it on the board.
Invention
- Have learners share and compare their results.
- See if they can transfer the idea of a standard unit from previous activity. If not, ask them why different groups have different results? all are different or non standard units
- Yes. The vials are not a standard unit for measurement of capacity.
- A liter and milliliter are.
- Show liter and milliliter with beakers and containers.
- Have students practice reading the scale on the graduated cylinder, put them in pairs and randomly call out certain numbers for them to locate or just have them measure to the closest ten milliliters.
- Have students use the graduated cylinder to measure the capacity of the cup in ml.
- Tell. Share your measurements by writing it on the board. The result, most probably will not be the same. Focus on the results as being closer than the measurements with the vials. Develop the idea of standard unit now and later work on accuracy.
- Ask. Why do scientists want to use a graduated cylinder to measure liquid capacity? Accuracy to measure and communicate better.
- Review the term standard unit of measure.
- Ask. Why it is important to have standard measurement? To have a standard unit that all people understand so we can communicate better. Point out that if you want to know how much is in a container or how much to use in a recipe, medicine to take, to make it accurate enough to get the job down and when it's when you need to communicate to another person, the standard unit becomes necessary.
- Are ml and liters, standard or non standard? standard
- What kind of measurement is it? capacity or volume
- Why? because you are measuring how much it holds or the space it takes up
- Ask. What kind of measurement does a carpenter uses on their tape measure? feet, inches
- Are they standard or non standard? standard
- What kind of measurement is it? linear
- Why? because you are measuring lines the distance between two points.
- Ask. How to measure the amount of pop in a bottle? … Accept all standard capacity (volume) answer.
- Continue to randomly mention things to measure and ask what they would measure them with, if it is standard, and what they are measuring (linear or volume/ capacity)
- Have the students measure a variety of items with graduated cylinder, recording information on a lab sheet.
- Have students compare measurements.
- Discuss for instance why one person’s measurement is different than than the next person.
- Ask. How people use measurement outside of school?
- Ask. How important is it to be accurate? Depending on the age of your students you may or may not want to focus on accuracy. Young children have a difficult time accurately lining up rulers from start to finish and like with the straws end to end from start to finish. If your students are ready to proceduralize measuring then have them discuss and you can write a procedure to measure linearly.
- Ask. Why is a standard unit of measurement so important? To communicate measurement accurately.
Exploration
How many milliliters in a liter
- Tell. Pour water into the 100-ml beaker until it holds exactly 100-ml, then pour it into the 1-L beaker. Then repeat the process to see how many ml a L container will hold.
- Tell. Record how many beakers you put in and add them together (a calculator may be helpful).
- Tell. Share your measurements by writing it on the board.
- Have the groups share their data.
- Ask. What they discovered?
- Lead discussion on how many milliliters are in a liter and how they know this.
Measuring with a syringe
- Demonstrate how to use the syringe and graduated cylinder.
- Fill a cup half way full and hold it up.
- Ask. What kind of measurement is used to tell how much water is in the cup? capacity / volume
- Explain volume is the amount of space an object takes up.
- Demonstrate to the class how to use the syringe to measure the volume of the water inside the cup.
- Have the class retrieve their materials and allow them to put any amount of water into the cup.
- Have them measure and record the volume of the water in the cup by following the demonstrated process.
- Have the students then estimate and measure the capacity in various containers (cup, small vial, large vial). Be sure to have students record information on lab sheet.
- Ask. When would you need to measure volume?
- Ask. When do scientists measure volume.
Activity 3 - Wow Water
Materials
- Water, Food coloring, 3 jars one with 2 oz, 4 oz, & 6oz. per group, 4 clear measuring cups, lab sheet
Focus questions
- How much water is in each jar?
Learning outcomes
- Measure water in 1/4 & 1/2 cups.
Suggested procedures overview:
- Group learners.
- Have them measure 3 different jars of colored water.
- Discuss
Scoring guide for
Top level
- Decide on the accuracy of measurement for a task and measure liquid volume to an acceptable accuracy.
- Pour water into a measuring cup and declare its volume haphazardly.
Lower level
Exploration
- Divide the class into four groups.
- Give each group three jars with colored water labeled A, B, & C.
- Tell. Write how much you estimate each jar contains.
- Measure each and record the amount.
- Remind. All measurements are estimates and no measurement is exact. Scientist must decide how accurate they need to be according to the task they are doing.
- Ask. How accurate should we be? quarters of a cup: 1/4, 2/4 or 1/2, 3/4, 4/4.
- Tell. Share your measurements by writing it on the board.
Invention
- Tell. Let's discuss our results.
- How accurate were we? pretty good
- Ask. Would this accuracy be appropriate for what kinds of measure? baking a cake, making medicine in a pharmacy, measuring plant food, putting oil in a car… .
- Ask. Where could you use what you learned?
- Ask. What is a standard unit of measure?
- Ask. What did you measure? capacity, liquid, liquid volume, volume
- As in the previous activity. Suggest different kinds of objects to measure and ask if they should use a standard measurement or not and if so what kind of measurement and what accuracy.
Activity 4 - Weight Watching
Materials:
- For each group of four learners:
1 Equal arm balance, 2 plastic cups, boxes of paper clips, Set of gram weights, Washer, Wood square, Poker chips, Sponge, Container _ -liter (for water), Zip bag (Sm), Lab sheet How Heavy Is It?, Lab sheet Steps for Weighing an Object
- For the class:
1 box jumbo paper clips, 2 boxes regular paper clips, 1 bag of gravel, 9 zip bags (med.), Transparent tape, 1 pitcher, water, 1 apple or orange
Focus questions:
- How much do these object weigh?
- Which of these (washer, wood block, and poker chip) is heaviest? Lightest?
Learning outcomes:
- Weigh objects to an acceptable accuracy.
Suggested procedures overview:
- Arrange three objects by weight challenges
- Weigh three objects
- Review linear, capacity or liquid volume, and weight or mass
- How much water in a sponge challenge.
- Make 100 gram weight challenge. Or kilogram
Scoring guide for
Top level
- Decide on the accuracy of measurement for a task and measure weight or mass to an acceptable accuracy.
- Put counter weights onto the balance and quickly declare its weight haphazardly.
Lower level
Exploration
- Give learners washers, wood blocks, and poker chips.
- Ask. Can you arrange these items (washer, wood block, and poker chip) in order from heaviest to greatest?
- How do you know?
- Place the washer, wood block, and poker chip in order from heaviest to lightest.
- Introduce the balance – identify parts and demonstrate how to use it by placing one object on either side and show which is more or less.
- Challenge the students to tell how to find which of the three is the heaviest and lightest.
- Use the students ideas to verify which of the three objects is heaviest and lightest by taking turns putting one of the three objects on one side and another on the other.
- Demonstrate how to use paper clips as weights to find the weight of an object, other than the washer, wood block, and poker chip.
- When students are ready, have them weigh the three objects, using paper clips.
- Tell. Share your measurements by writing it on the board.
- Discuss findings.
- Introduce the gram weight set.
- Have students measure the three original objects using gram weights and record the weights in their lab notes.
- Tell. Share your measurements by writing it on the board.
Invention
- Ask. How do the different ways of measuring weight compare?
- What was different or better?
- Why?
- What was standard and non standard?
- What does grams measure? weight or mass
- What does weight or mass measure? How much stuff (matter) is in an object.
- Ask. What are the three different kinds of measurement we have investigated? linear, capacity or liquid volume, weight or mass
- Ask. What are so me standard units for each? linear = cm, m, ft, inch, mile, liquid volume = ml, l, cup, quart, gallon, weight = gram, kilogram, pound, ounce...
Exploration
Challenge; How much water does a sponge hold?
- Give the learners a sponge and challenge them how to discover how much water can be soaked up. Measure it when it is dry, soak up water and measure it again. Or how much water a wet sponge can soak up after it has been wrung out.
- Discuss. How to find out.
- Conduct sponge investigation and record on lab sheet.
- Discuss the results of the investigation.
Challenge: How much is 100 grams?
- Challenge learners to make a 100-gram weight using gravel.
- Have students think of objects that are approximately equal to a kilogram.
- Reflect on activity.
- Ask. What other uses can you think of for the balance?
Activity 5 - The Third Degree
Materials:
- For each group: 3 plastic cups, Labeled A, B, & C, Thermometer (alcohol, Celsius), Straw, Container (1/2- liter), Record sheets (Measuring Temperature, Graphing Cold Water), Basin, Syringes
- For the class: Pitcher of ice water, Pitcher of room temperature water, Clock, Ice, Newspaper, Paper towels
Focus questions:
- How can you measure the temperature of water?
Learning outcomes:
- Use a thermometer to measure temperature of water.
Suggested procedures overview:
- Order three cups of water by temperature
- Measure the temperature of three cups of water
- Measure the temperature of hot and cold cups of water before and after mixing.
- Measure the temperature of water before and after adding ice.
Scoring guide for
Top level
- Measure the temperature of water accurately by waiting for the temperature on the thermometer to get stable and level eye sight with the thermometer.
- Measures inaccurate temperature of water by reading the thermometer from above or below and before it reaches the temperature of the water.
Lower level
Exploration
- What makes water a given temperature?
- How can you measure the temperature of water?
- Give learners three cups of water at different temperatures.
- Tell. Put the cups of water in order of temperature.
- Each learners takes a turn.
- Ask. How did you decide what order to put the cups in?
- Give learners thermometers to measure the temperatures of the water and record results.
- Tell. Share your measurements by writing it on the board.
Invention
- Discuss how they were the same and different and why there was any differences. Different cups of water were different temperatures, thermometers measured differently, looked at the thermometer at different angles ...
- Ask. How can the temperatures be changed? Add heat or ice
- Tell. Measure the hot and cold water temperatures, then mix the hot and cold and predict what the temperature will be.
- Explore the creation of additional temperatures and record.
- Describe cool off. "When you put ice in water, does the water get cold?" "How cold?"
- Ask students to explore with ice cubes and water.
- Gather cool off data.
- Reflect on the activity.
- Extend to real life by a discussion of what you would do to cool off a cup of hot chocolate.
Activity 6 - Tempting Temps
Materials
- Thermometer for every student or one for each group, lab sheet, Grid for graph, weeks temperatures
Focus questions
- How does the temperature determine how you dress?
- How does the temperature change over a week?
Learning outcomes
- Take daily temperatures and plot a daily average for one week.
Suggested procedures overview:
- Discuss temperature related to weather.
- Collect a weeks worth of temperatures.
- Graph the daily temperature in F.
- Graph the daily temperature in c.
Scoring guide for
Top level
- Measure the temperature of air accurately by waiting for the temperature on the thermometer to get stable and level eye sight with the thermometer.
- Measures inaccurate temperature of air by reading the thermometer from above or below and before it reaches the temperature of the air.
Lower level
Exploration
- Ask. How do you know what to wear in the morning? …shorts, winter coat, etc?
- How do you figure out what the temperature is going to be throughout the week?
- Discuss how you would figure out the average temperature for a week. do you use the morning, noon, or before end of school temperatures, or the difference between the high and low of these as average daily temperature and plot it?
- Give learners data collection sheet and have them decide a plan of action to measure the daily temperatures to collect and plot.
Invention
- At the end of the week use data on the collection sheet to create a line graph.
- Show the average temperature.
- Discuss the importance of knowing the temperature.
Discovery
- Do the same activity using the Celsius thermometer.
- Compare and discuss differences in the two charts.
- How would this information help in your every day life?
Activity 7 - Rocks
Materials
- Rocks (enough for each group to have 3), graduated cylinder (enough for each group to have 1), eye dropper, water basin, water, paper to record information, tape, pen
Focus questions
- What is the volume of a rock?
- How can we find the volume of a rock?
Learning outcomes
- Determine the volume of a rock by displacement of volume.
Suggested procedures overview:
- Use displacement of water to find the volume of three rocks.
Scoring guide for
Top level
- Measure liquid volume to an acceptable accuracy by looking at the top of the water level and reading the scale accurately.
- Measure liquid volume inaccurately by looking down or up at the top of the water level and reading the scale inaccurately.
Lower level
Exploration
- Have learners form groups and select 3 rocks for each group, a graduated cylinder, and water to put into the cylinder
- Have students label each rock A, B, & C.
- Ask. By looking at the rocks can they place them in order of least to greatest volume?
- Have each group estimate which rock has a bigger volume.
- Record estimated order.
- Place rocks in estimated order of largest to smallest.
- Have the students fill cylinder half full of water (15ml) use an eyedropper and be as accurate as possible.
- Have students drop each rock, one at a time into the graduated cylinder and record the amount of water now in the cylinder.
- Have students record the number the water rose to on the cylinder.
- Repeat for each rock.
- Have students figure out which rock has a bigger mass by subtracting the original amount of water from the amount of water with the rock in the cylinder.
- Record findings.
- Have students compare that information with their estimations.
- Tell. Share your measurements by writing it on the board.
Invention
- Discuss the results and determine which rock has the most volume.
- Ask what is the standard unit of measurement they used? ml
- Ask. How is the volume different than weight? volume measures the amount of space and object takes up and weight measures the amount of stuff (matter) in the object
- Ask. Why it was easier to judge which rock was bigger using the water and the graduated cylinder.
- Ask students where the use of volume is used in their life. All liquid products, ...
- Can ask questions to review standard, non standard, linear, volume, weight, and how each is measured.
Activity 8 - Putting It All Together
Materials
- Rocks of various sizes, graduated cylinder (enough for each group to have 1), water basin, water, ruler, thermometer, scale, beaker
Focus questions
- What are the different ways to measure a rock?
Learning outcome
- Measure length, temperature, mass, weight, and volume.
Suggested procedures overview:
- Learners will rotate through four stations and measure a rock's length, temperature, mass/ weight, and volume.
Scoring guide for
- See scoring guides for different measurement in previous activity plans.
Exploration
- Have the learners form groups.
- Set up room into stations where the students can do one of the following measuring activities at each station:
- Station 1: measure the length of the rock (using the process previously learned)
- Station 2: measure the temperature of the rock (using the process previously learned)
- Station 3: measure the mass of the rock (using the process previously learned)
- Station 4: measure the volume of the rock (using the process previously learned)
- Give each student a rock and challenge them to measure it four ways.
- Let students rotate through the four stations to measure and record their measurements in their lab notes.
Invention
- Conduct discussion to elaborate on their finding. Ask why these skills will be useful to them in their everyday lives.
- Review standard, non standard, linear, volume, weight, how each is measured, and examples of how they can be used.
Lab notes
Activity 1 - First straw
Materials: Straw
How long is the table?
Materials: meter tape
How long is the table in centimeters?
My measurements.
Length of my foot
Length of _________ foot
Something small _______________
Something medium _______________
Something tall __________________
How do I measure:
What is a standard unit to measure length?
Activity 2 - Take Me To Your Liter
Materials:
- Vial, 100ml graduated cylinder, 50-ml Syringe, Plastic cup, 1-L container
How many vials of water are in the cup?
How many milliliters are in the cup?
Other containers we measured and their capacity
Activity 3 - Wow Water
Materials:
- three containers with colored water, measuring cup.
Draw a picture of cup A, measure the amount of liquid, and write it beside your picture.
Draw a picture of cup B, measure the amount of liquid, and write it beside your picture.
Draw a picture of cup C, measure the amount of liquid, and write it beside your picture.
Activity 5 - The Third Degree
Materials:
- Cups of water at different temperatures, hot water, cold water, ice, thermometers
What is the temperature of cups of water?
What is the temperature of the hot water and cold water before mixing.
After mixing.
What does the difference suggest?
What is the temperature of the water before adding ice?
After mixing ice?
What does the difference suggest?
Activity 6 - Tempting Temps
Materials:
- thermometers, temperatures for a week.
Temperature for Monday
Temperature for Tuesday
Temperature for Wednesday
Temperature for Thursday
Temperature for Friday
Temperature for Saturday
Temperature for Sunday
Activity 7 - Rocks
Materials: 3 rocks, a graduated cylinder, eye dropper, and water
Starting amount of water before rock A.
Amount of water after rock A is added to the graduated cylinder.
Volume of water displaced.
Volume of rock A
Starting amount of water before rock B.
Amount of water after rock B is added to the graduated cylinder.
Volume of water displaced.
Volume of rock B
Starting amount of water before rock C.
Amount of water after rock C is added to the graduated cylinder.
Volume of water displaced.
Volume of rock C
Activity 8 -
Materials: Measuring tools and objects to measure. Rocks, graduated cylinder, containers, centimeter ruler, thermometer, equal arm balance and weights
Word bank: volume, linear, centimeter, gram, weight, standard measurement, temperature, degrees
Describe each station, what is there, how you measured a rock, the results, and what kind of measurement.
Station 1
Station 2
Station 3
Station 4
Support materials
Picture of an acre


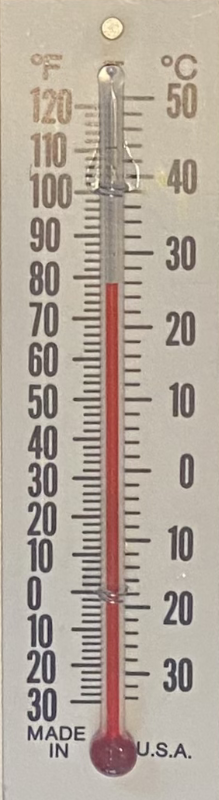
Thermometer
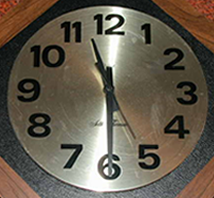
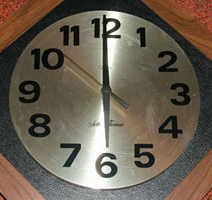
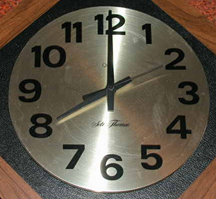
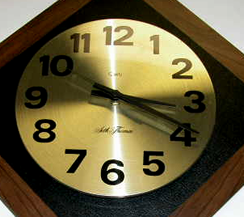
Analog clocks
What times are on the clocks?
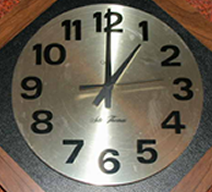
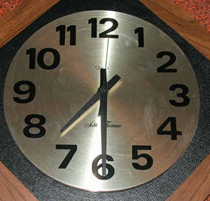
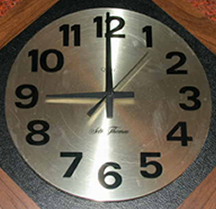
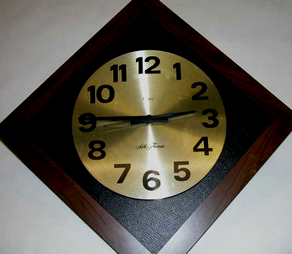
Analog clocks
What times are on the clocks?
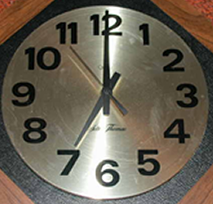
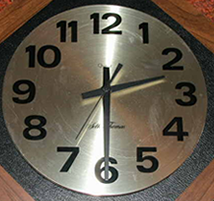
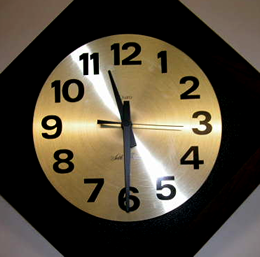
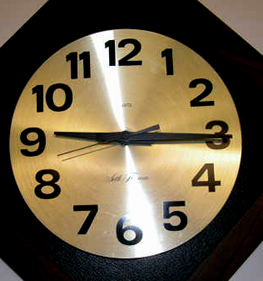
Analog clocks
Tell the time to the minute.
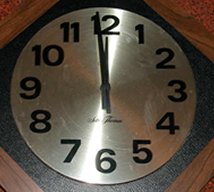
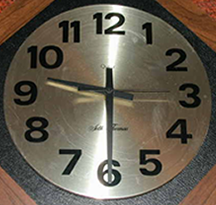
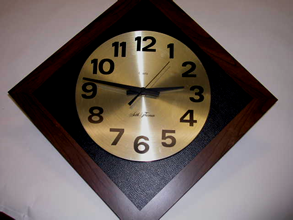
Analog clocks
Tell the time to the minute.
Set a time on the clocks.

Set a time on the clocks.
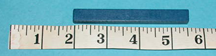
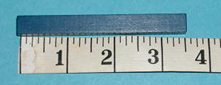
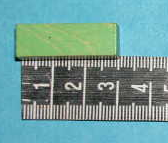
Linear Measurement
What is the length of the rods?
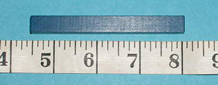
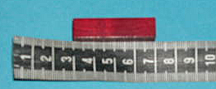
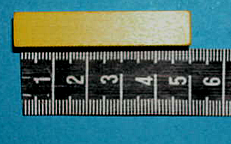
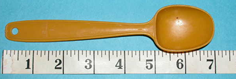
Linear Measurement
What is the length of the objects?


Thermometer readings - Celsius
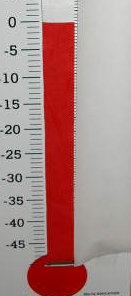
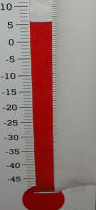
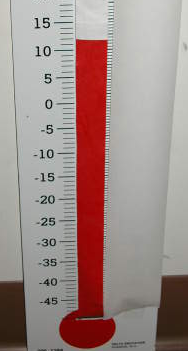
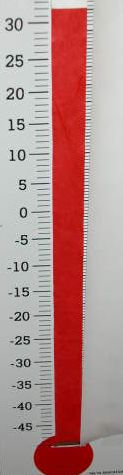
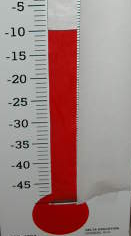
Thermometer readings - Fahrenheit